If you are seeing the dreaded iPad is Disabled: Connect to “iTunes” error, this post will help you get rid of it.
iPad is a great device in terms of portability, accessibility, and elegance and it has been designed with perfection and that holds equally true for its security system.
The security system has been tightened so much that it is nearly impossible to access your device if it has been infringed, or even when someone types in a wrong password redundantly.
Now, this can either happen on purpose when someone is trying to unethically log in to your device or it can happen accidentally. And more often than not, the latter takes significance when you just don’t remember your password or your kid fiddles around with your device only to disable it eventually.
There are a bunch of reasons why your iPad is disabled and can’t connect to iTunes, in the next section of this post we are going to list all the major problems and then tell you exactly how to fix them.
Table of Contents
- 1. Reasons for the Error
- 1.1. Too Many Passcode Attempts
- 1.2. Error While Connecting to iTunes
- 2. Solutions to Fix the issue
- 2.1. Using iTunes
- 2.2. Restoring your iPad Through iTunes from a Previous Backup
- 2.3. Using the iPad Recovery Mode
- 2.4. Using 3rd Party Software
- 2.5. Using EaseUS iPhone Recovery
- 2.6 Fix the Issue Without Restoring
- 2.7 Fix the Issue with Non-Computer
- 3. Take it to the Service Center
- 4. How to Avoid the Issue in Future
- 4.1. Remember Your Passcode or Don’t Use One
- 4.2. Say no to Children
- 4.3. Always Have a Contingency Plan
1. Reasons for the Error
There are a couple of reasons why your iPad is disabled error appears on your device and depending on the frequency of their occurrence, they are:
1.1. Too Many Passcode Attempts
One of the most common reasons for iPad disabled connect to iTunes error is the extra wrong attempts on the device passcode. This usually happens when you either forget the passcode or other people (read naughty children) type in the passcode too many times, eventually leading to an error in question.
1.2. Error While Connecting to iTunes
Sometimes you have done everything right and didn’t mess up things like mentioned above but you still get bombarded with the error “iPad is Disabled, connect to iTunes” as soon as you connect to iTunes, ironic! But what happens to a lot of people. There is no absolute reason for this error except for the fact that it happens quite often.
No matter what triggers the error on your iPad, the next section is going to cover all the options you can try to get rid of this perturbing iPad Disabled, connect to iTunes error.
2. Solutions to Fix the issue
There are solutions to everything online but the problem is they are superfluous most of the time, if not easy to follow. But we promise this post is going to be different, as we are going to highlight the major solutions for this iPad Disabled, connect to iTunes error and hopefully do that in a manner that is comprehensive and easy to follow for most people.
2.1. Using iTunes
The first and probably the safest method to get rid of this iPad Disable, connect to iTunes error is to use the good old iTunes backup. This can be done by following the steps below:
Step 1: Connect your iPad to a PC or Mac through a functional and Apple verified USB cable.
Note: It should be noted that if you don’t have an original Apple Certified cable then that might be the problem for the error itself. I have personally found myself in error limbo only to find out later that it was a problem in the USB cable the whole time.
Step 2: Locate your device from the left side navigation pane, or simply search for the device from the search bar located at the top right-hand corner.

Step 3: You are going to find a Back Up Now option as soon as you hit the small iPad button highlighted in the image above. You can go ahead and Back Up your iPad now on your computer.
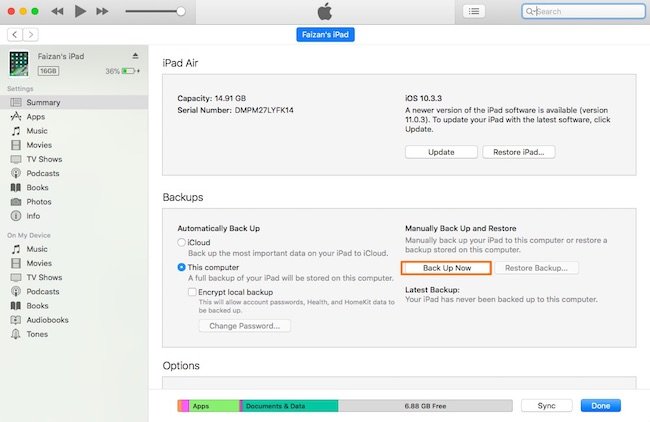
Step 4: As soon as you hit the Back Up button, you will be asked to type in the password of your iPad, and if you remember it correctly now, you can type in the password and cancel the backup subsequently.
2.2. Restoring your iPad Through iTunes from a Previous Backup
If this trick works for you then, great! You have successfully unlocked your device but, if the iPad Disabled, connect to iTunes still persists, you can follow the instructions laid down in the next section to restore your iPad from iTunes.
Note: This method works only when you already have a previous backup of your iPad on your Mac or PC.
Step 1: Connect your iPad to your PC and Mac and open iTunes
Step 2: If the synchronization process does not happen automatically, you will need to go to the “Back Up Now” button as mentioned in Step 3 of the previous section.
Step 3: Wait for backup and synchronization process to complete, this usually takes time, depending on the amount of data and apps on your device.
Step 4: Reconnect your iPad and click on Restore your iPad that appears right next to the Back up your device button.
Step 5: Choose “Restore from iTunes Backup Button”
Step 6: Locate the backup you just did in step 2 and wait patiently for the process to finish.
If everything goes as planned, you will not only remove the iPad Disabled, connect to iTunes error from your iPad but also have access to all data, documents, photos, emails, and settings.
2.3. Using the iPad Recovery Mode
If you are not able to use the first two methods, this is a sure shot as it completely restores your iPad to factory firmware and settings. However, if you still want to keep all of your iPad data, apps and settings on iPad, you should definitely backup your device on iTunes and then restore it after the issue is fixed. To put your iPad in recovery mode and remove iPad Disabled, connect to iTunes error, follow the steps enlisted below.
Step 1: Connect your iPad to iTunes through a certified Apple Cable.
Step 2: Reboot the iPad in Recovery mode. This can be done by switching off your device, keeping it connected to iTunes through the USB cable and then pressing and holding “Home” as well as “Power” button, simultaneously.
Step 3: This will put your iPad in Recovery mode confirmed by the presence of iTunes icon on your iPad as shown in the image below.

Step 4: After the iPad is restored, you can disconnect iTunes and iPad and reconnect again. You can then restore your iPad to the previous backup through iTunes to recover all the data, apps and documents.
2.4. Using 3rd Party Software
If you are not a big fan of contingency and don’t find yourself backing up your iPad just for the sake of it, then restoring your iPad from iTunes is definitely not going to help. There is, however, an effective alternative, the alternative is in the form of 3rd Party Software that allows you to get rid of this irksome iPad Disabled, connect to iTunes error without actually having to use iTunes.
The first method we are going to demonstrate doesn’t employ even a third party app to fix the issue but instead uses the iCloud Backup to do so. If you are not familiar with iCloud, follow the instructions laid down in the next section to remove iPad Disabled, connect to iTunes error from your iPad.
Note: This method works only if you already have iCloud sync and backup enabled on your iPad.
Step 1: From a PC or Mac, open a browser and type in icloud.com/find in the browser.
Step 2: You will be prompted to sign in with your Apple ID, use the same ID as that on your iPad to log in.
Step 3: At the top of your browser window, you will find an All Devices button, click on it.
Step 4: Select your iPad and Press Erase [Device] button, this will remove passcode and unlock the disabled iPad without iTunes.
Step 5: Now, you can restore your iPad from the iCloud Backup to gain access to all data, apps, and documents.
2.5. Using EaseUS iPhone Recovery
This software allows you to restore your iPad from iCloud backup without having to use iTunes and therefore comes in handy if you are not able to connect your iPad to iTunes for some reason. The method can be used to access your disabled iPad and more importantly helps you eliminate the iPad disabled, connect to iTunes error. To use EaseUS for this purpose, follow the instructions laid down in the next section of this post:

Step 1: Download the software for Mac or Windows from the links below.
Windows: http://download.easeus.com/trial/ems_trial.exe
Mac: http://download.easeus.com/trial/ems_mac_trial.dmg
Step 2: After you have downloaded and installed EaseUS on your computer, launch the software and choose Recover from iCloud from the left-hand navigation bar.
Step 3: You will need to navigate to the most recent iCloud backup or the backup that was working properly from the next section. You will then need to press Scan to download it to your computer, and search data.
Step 4: After the scan is complete, you will be asked to choose the right file types that you wish to recover and install on your iPad. When you are done with all options, click the Recover button to restore all the data, apps and documents to your iPad.
2.6 Fix the Issue Without Restoring
If you are somehow not able to make the recovery mode work, or not able to connect to iTunes or still not able to fix the iPad disabled, connect to iTunes problem with the solutions mentioned earlier, there is still hope. This problem is not sparing but it is not seldom either, a lot of people report that they are not able to put their iPad into recovery mode and therefore don’t care about losing data after all a data-less working iPad is better than a complete brick.
The next section of this post is going to help you Fix the Issue Without Restoring your iPad. The method we are going to use is called “Putting your iPad in DFU (Device Firmware Update) mode”. This method is a sure shot to not only remove iPad disabled, connect to iTunes error, but also for the gravest errors on an iOS device and if DFU doesn’t work there is not much you can do, except for taking your device to Apple service center.
Putting your iPad in DFU mode is, however, a bit tricky, it needs a bit of practice but if you follow the steps mentioned below, you will be able to restore your iPad easily.
Step 1: Plug in your iPad into a Mac or PC.
Step 2: Launch iTunes.
Step 3: Power off your iPad.
Step 4: Press and hold the On/Off button on your iPad (The button located on top) for 3 seconds and immediately follow the next step.
Step 5: Press and hold the Home button (The main button below the screen) without removing your finger from the On/Off button.
Step 6: Keep on holding both the buttons for about 10 seconds continuously.
Note: If you can see an Apple logo after step 6, it is an indication that you have launched your iPad normally and therefore need to restart the whole process.
Step 7: Let go of the On/Off Button but keep holding the Home button for about 5 seconds.
Note: If you see the “Plug into iTunes” screen, then you’ve held it too long and will need to start again.
Step 8: If the screen stays completely black, Kudos! You have entered the DFU mode successfully and will be alerted by iTunes that it has detected your iPad and is, therefore, ready to be restored.
2.7 Fix the Issue with Non-Computer
OK! We are going to say it blunt and without beating around the bush, there is no way that you can Fix the iPad Disabled, connect to iTunes issue without actually connecting it to iTunes. You can go on for hours searching for the same on the internet. Forums, websites, YouTube, you name it, we have checked everywhere but no one seems to provide the right guide to fix the issue with Non-computer. Even the official Apple support suggests you put your iPad into recovery mode through iTunes.
Keeping all that in view, we think that if you do not have access to a personal computer you can borrow one and install iTunes on it. You can then either put your iPad in recovery mode like we mentioned in the previous section of this post. However, we personally think that the best fail-safe mechanism to get rid of this iPad disabled, connect to iTunes error is to put your device into DFU mode and performing a complete factory restore. The entire process has been laid down in section 2.6 Fix the Issue Without Restoring.
3. Take it to the Service Center
If you have tried everything in this post without any result, then it will be safe to assume that there is not much you can do than to take your disabled iPad to a Service Center. There are plenty of Official as well as unofficial Apple Care centers throughout the world but we recommend you take your iPad to a store that is Apple certified.
You can find an Official Apple service center around you through this link and select Service and Support. You will then be prompted to insert your postal address and Pincode and the website will give you a list of nearest Apple Service centers.
4. How to Avoid the Issue in Future
This might sound like a cliché, but “Prevention is better than cure” and it is a cliché for a reason, and this time, for the right reasons. We are sure that following any or all the methods in this post were cumbersome so it is always better to prevent this from happening in future. There are a few tips you can take home from this post to prevent this iPad disabled, connect to iTunes issue from happening in future.
4.1. Remember Your Passcode or Don’t Use One
If you do not have heavy intel or extremely private information on your iPad and you also tend to forget things, the best thing to do is to just avoid Passcode altogether. In case you are still wary about your privacy, we suggest you at least keep it written physically somewhere to use it in inadvertent circumstances.
4.2. Say no to Children
If you are going to give your iPad to children, why bother with the Passcode anyway? The best way, therefore, is to remove the Passcode entirely, or at least when it is with those pesky infants.
4.3. Always Have a Contingency Plan
This is not going to prevent iPad Disabled, connect to iTunes error but it sure is going to help you, if unfortunately, you hit this rock bottom in future. You should always try to keep iCloud backup synced and working when you are on a Wi-Fi connection. And it is also a great idea to backup your iPad every once in a while on your PC or Mac through iTunes.
We hope this exhaustive post was able to fix the iPad disabled, connect to iTunes issue on your device. If it still persists, feel free to reach to us with the errors and we will try to get back to you as soon as possible.